Life as a Traveler in the 1800's: Bridge Building

Rationale
The unit on the life of a traveler in the 1800’s is an authentic task of research and report that students will be asked to do as 5th grade engineers and future productive citizens who will become team collaborating experts who write proposals, design, build, test, evaluate, self-reflect/ rethink, and present. Students will demonstrate their ability to work collaboratively with their groups to design, build, test, evaluate their peers, self-evaluate their work, and present their findings. Furthermore, students will demonstrate their ability to develop a presentation utilizing a visual aid to present their proposal, design, bridge, test results, evaluations, self-assessments, and research findings according to team expectations & criteria provided. Introduction to life as a traveler in the 1800’s.The Readings
The Great Brige Building Contest
https://sites.google.com/site/thegreatbridgebuildingcontest/welcome
Building Big Bridges:Bridge Basics
Bridges & Tunnels: Investigate Facts of Engineering
Donna Latham https://nomadpress.net/nomadpress-books/bridges-tunnels/
The Tasks
Key Unit Learning
Students will work in teams to learn:
- What life might have been like for a traveler in the 1800’s.
- How building bridges and new inventions changed the infrastructure of our country.
- The benefits, advantages, disadvantages, and different types of bridges/ inventions of this time.
- How to research/ write a proposal/ design/ create/ evaluate/ synthesize present according to curriculum criteria and specifications listed.
- How to successfully integrate mathematics, art, ELA, science, technology, and social studies into their unit on: “The life of a traveler in the 1800’s”.
- About different kinds of bridges/ inventions during the 1800’s.
- About the advantages and disadvantages of different kinds of bridges/ inventions.
- About the advances in technology that improved the quality of steel.
- About the benefits of building bridges in the 1800’s and will compare it to society today?
Building Bridges Student Handout
I Goals
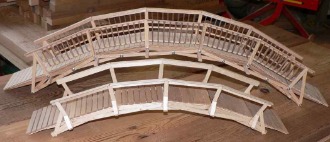
- Students will work collaboratively in their assigned groups to develop a bridge proposal, design it on paper, and then, build it with popsicle sticks.
II. Collaborative Groups
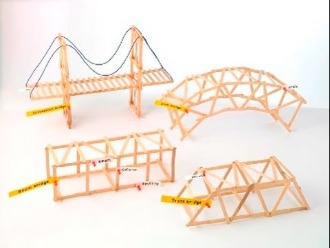
- You are part of a team of engineers who have been given the challenge to design a bridge out of up to 200 popsicles sticks and glue. a. Bridges must be able to hold a specific weight.
b. The bridge must span at least 14 inches or more in length, as when it has been constructed, it will be placed between two chairs, so it is at least one foot above the floor for a weight bearing test.
c. The bridge will be judged on aesthetics and meeting the structural and weight bearing requirements.
d. Be creative!
e. Furthermore, you are encouraged to use the fewest number of popsicles possible to achieve your goal.
III. Planning Stage (lesson 1)
- Meet as a team and discuss the problem you need to solve.
- Develop and agree on a design for your bridge.
- Develop a proposal to build your bridge.
- Before beginning to build your bridge you must decide on the number of popsicle sticks you anticipate using to build your bridge.
- During construction, you may decide you need additional sticks (up to 200) or that your design needs to change.
- This is ok --Just make a new sketch and revise your materials list.
- Remember your ratio: is one popsicle stick= one 2’ x 8’ x 12’ wood beam.
- a. You'll need to determine how many popsicle sticks you will use (up to 200)
b. These are the steps you will take in the manufacturing process.
c. Think about what patterns might be the strongest; but, remember, you are also being judged on the aesthetics of your bridge!
d. Draw your design in the box below and be sure to indicate the number of sticks you anticipate using.
e. Present your design to the class along with your bridge proposal for a peer review.
f. You may choose to revise your teams' plan after you receive feedback from class.
IV. Construction Phase (lesson 2)
*Supplemental Materials & Resources*
-
a. Teacher Resource Documents
b. Student Resource Sheets
c. Student Worksheets
d. One set of materials per group
e. 200 popsicles sticks per group
f. Hot glue gun per group
g. Standard 5, 10, 15, 20-pound weights (may use standardized exercise weights)
Examples Below:
Lesson 1 (two days)
Review
- Students will review/ discuss prior learning, listen to a story about bridges, actively engage in a class discussion, and rotate through their learning centers to reaffirm/ document learning.
Planning Stage
- Students will work in collaborative teams to develop a written bridge proposal that includes a cost analysis, measurements, computations, & bridge design within an arbitrary budget.
- Proposal will include a written report with an explanation of why the team choose specific materials, list of material costs (Example: one popsicle stick equivalent to a 2’ x 8’ x 12’ beam), and why the group believes their bridge will be successful.
- Teams will present their proposals for peer review.
Lesson 2 (two days)
Review
- Students will meet with teacher to review prior learning, rotate through learning centers to reaffirm/ document learning, and share any concerns they have with their proposals or peer reviews.
Construction Phase
- Students will meet as a team to discuss their plan, peer reviews, and any concerns or last minute changes before beginning to build their bridges.
- Students will utilize their design and lesson criteria to collaboratively build their bridges.
- Students will meet as a team to discuss any concerns or issues around their built bridges.
- Students will utilize the aesthetic vote chart to conduct / document the bridges of the other two teams.
Review
- Students will meet with teacher to review prior learning, rotate through learning centers, and share any concerns they have with their bridges.
- Students will meet with their teams to discuss any issues prior to their bridge evaluations.
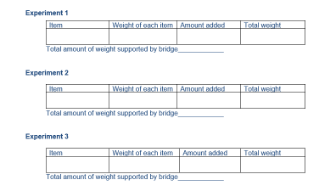
- Students will conduct three experiments involving weights placed on their bridges.
- Students will document their finding on the experiment charts.
- Each team will meet to discuss and complete the bridge evaluation chart for their bridge.
- Students will evaluate their teams' results, complete the evaluation worksheet, and develop a visual aid to present their findings to the class.
- Student will complete their individual self-assessments.
Notes for Teacher
- Strategies to teach students how to Turn & Talk: http://engaginglearnersinuppergrades.blogspot.com/2012/07/routines-and-procedures-turn-and-talk.html
- Collaborative Team Member Roles & Responsibilities: a. Accountant: Makes sure that project stays within the budget b. Recorder: Writes the proposal based on the ideas of the group c. Resource Manager: Collects bridge materials/ informs accountant of needs d. Lead Engineer: Guides the group in making the best scientific decisions e. Publicist: Prepares the group for the final bridge demonstration/ presentation
- The students in the class have been together since the beginning of the year.
- Students understand their routines, rules, and expectations.
- They fully understand how to rotate through the learning centers and their behavioral expectations.
- Students understand how their collaborative roles are to function and their assigned team learning expectations.
- Each student has a learning plan that includes their current knowledge base, peer buddies, learning styles, strengths & weaknesses, and whether they require additional services, such as, students with disabilities, English Language learners, students with Central Auditory Dysfunction, ADHD, or students with cultural accommodations.
- The lessons have a detailed modifications & differentiation section under the preparation category to ensure students receive necessary modifications/ differentiation as needed.
.png?1534397031898)
.png?1534399740766)
.png?1534395401603)
.png?1534395395008)
.png?1534395399248)